Replacing a water heater is not glamorous work, but good preparation sets up years of trouble-free service. I have hauled old tanks out of cramped closets, slid new ones into garages that sloped like ski jumps, and dealt with every surprise from corroded gas nipples to laundry shelves installed two inches too low. The lesson repeats itself: the cleaner your setup before the installer arrives, the safer the job goes and the better the result. Whether you are working with a water heater installation service or a licensed plumber you already trust, the steps below will help you get the space ready for a standard tank water heater installation and avoid the kind of last-minute hiccups that lead to extra trips and change orders.
Why the space matters more than the model
People obsess over size, brand, and efficiency ratings, then ignore the closet or garage where the unit will live for the next decade. The space dictates everything: combustion air for gas models, venting path, earthquake strapping, drain routing, and clearances for servicing the burner, anode, and thermostat. A tight location forces compromises, and a poorly prepared location can burn time and money. I have seen installations stall because the vent could not clear a roof overhang, or because the new expansion tank had no anchor point, or because the floor pan had nowhere to drain. None of those problems are on the box the day you buy the heater. They live in the room.
If you are debating tankless water heater installation down the road, many of the same principles apply, especially vent routing, gas capacity, and condensate management. But for a tank unit, a few details carry even more weight: floor support, height for the top connections, and thermal expansion control.
Start with the basics: sizing and codes
Even if you are only prepping the space, get clear on the target unit’s size, fuel type, and venting style. A typical 40 to 50 gallon gas tank stands 58 to 62 inches tall and measures about 20 inches in diameter, though high-recovery or power-vent models can be taller or require larger vent pipe. Electric tanks range from squat lowboy styles for crawlspaces to tall variants that can push past 60 inches. Heat pump water heaters require far more vertical clearance and air volume. Without these reference points, you risk building a space that fits your old unit but not the replacement.
Local code sets minimums for clearances, combustion air, seismic strapping, drain pans, drain routing, and, in many jurisdictions, expansion tanks. It also governs how a water heater can be located in a garage, a closet, or a space that opens to sleeping areas. Codes evolve. What passed inspection 15 years ago when your last water heater was installed may not cut it now. If you are hiring a water heater installation service, ask them which code cycle they follow and whether your municipality layers on local amendments. Five minutes on the phone can save a half-day delay.
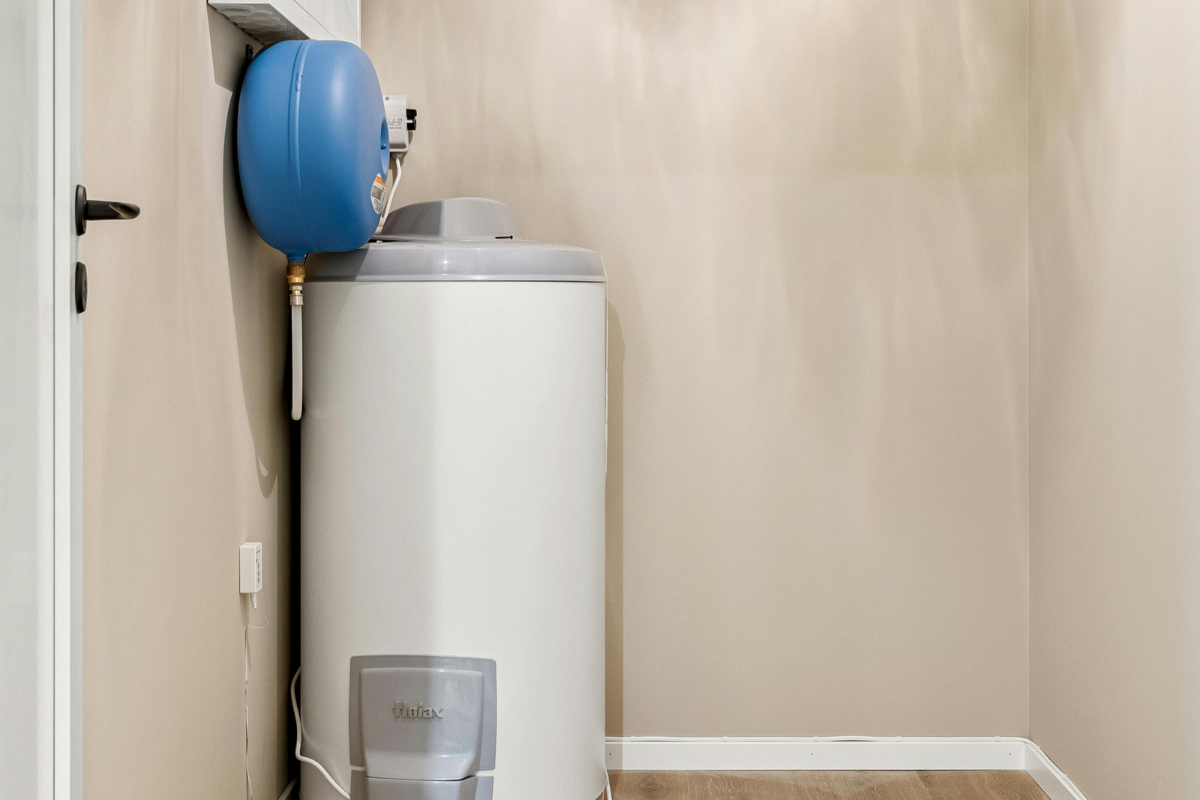
Preparing a closet: make a tight space work
Closet installs are unforgiving. You cannot fudge a half inch once the drywall is up and the door is trimmed. When I prepare a closet, I think in terms of pathways, not just clearances. The unit needs a straight path in and out, even if that means removing door stops temporarily. It also needs a service pathway for the tech who will change the anode, replace gas controls, or swap a TPR valve years from now.
Clearance and access start at the floor. Measure the footprint of your chosen water heater, then mark the perimeter on the floor with painter’s tape. Add two to three inches on the sides you will use for piping and service access. If the heater needs a drain pan, tape that outline too. Confirm the door opening is wide enough to pass both the pan and the tank without tilting excessively. I have watched crew members wrestle a 50 gallon tank around a jamb, only to ding the drip edge and lose an hour cleaning up metal shavings. A quick check prevents that circus.
Combustion air is the next hurdle for gas models. A closet with a solid door often needs louvered vents top and bottom, or transfer grilles to an adjacent room or attic, sized to the BTU input of the unit and the venting method. If the previous heater had a louvered door, make sure the replacement is still adequate. Newer high-input models may demand more air. If you plan to replace a standard atmospheric vent unit with a power-vent or direct-vent, the combustion air strategy changes. Don’t cut openings before you confirm the venting type with your installer, or you may be patching drywall.
Fire safety inside closets gets overlooked. Gas water heaters need proper venting clearances and cannot share a closet with volatile solvents. If the closet doubles as a utility space, clean out paint, adhesives, and anything that outgasses flammable vapors. For electric units, the main hazard is electrical clearance and the routing of the whip or conduit so it does not rub or get pinched by the water heater jacket. Either way, plan for a drip pan with a drain line routed to an approved termination. That line cannot simply dump into the crawlspace. A common fix is a drain routed to the exterior with a visible termination above grade, sloped continuously. Test it with a quart of water before the heater goes in.
Closets often fall short on elevation in areas where ignition sources must be raised. A gas water heater in a space that opens to a garage or where gasoline or vapors may be present typically must sit on a platform at least 18 inches above the floor, unless it is FVIR rated. Modern FVIR designs control ignition from flammable vapors, but local code and inspector preference vary. Verify whether your unit’s label satisfies the requirement or if you need a platform. If a platform is required, frame it solidly and sheath with plywood that can handle the weight. A 50 gallon tank weighs more than 400 pounds when full, more when hot.
Finally, plan the route for the pressure relief discharge. The TPR valve must discharge through a full-size pipe to a safe location, usually outside, within a few inches of the ground, or into a drain through an air gap. It cannot reduce in size, thread closed, or turn up at the end. Closet installs often force creative routing. All creativity must stop at the code book. If you cannot run a dedicated line with continuous fall, discuss alternatives with the installer before demo begins.
Preparing a garage: respect slopes, vehicles, and ignition rules
Garages introduce different problems. They slope toward the door, have vehicles that inch closer over time, and present ignition hazards. Codes generally require protection from vehicle impact. In practice, that means installing the heater out of the drive path, adding a bollard, or building a raised curb or platform. I have seen beautiful, tidy installs smashed by a bumper in the first week. A single steel bollard anchored into the slab costs less than a service call.
That slope you barely notice when walking matters when the heater sits in a pan. A pan must drain by gravity, and a sloped slab can work for or against you. If the pan drain needs to run opposite the slope, you may have to shim or pour a small, level pad so the drain outlet is not the high point. A half inch of slope across the pan can leave water trapped and rust the pan lip. Check with a level and decide whether to form a small pad or use non-compressible shims under a steel stand.
Garage air often carries dust and fumes. Keep the area around the heater clear. Store fertilizer, chlorine tabs, and paint far away. If the heater must be 18 inches off the floor due to ignition height rules, use a stand rated for the load and sized so the pan fits fully on top, not perched. Stands with lips help prevent pan migration during minor seismic events.
Vent routing in garages can be straightforward if you have a short run to an exterior wall or roof, but changes in model type can complicate things. Swapping an atmospheric vent unit for a power-vent may require a new sidewall termination and a condensate path, while moving to a direct-vent can free you from relying on indoor combustion air. If you are sticking with atmospheric venting, inspect the existing vent connector and chimney or B-vent for corrosion, backdraft staining, or improper slope. Four feet of shiny new vent pipe connected to a flaking vertical chase is lipstick on a pig. Flag it for replacement during the water heater installation.
Floor pan, drains, and managing leaks
Every water heater leaks eventually. It might be a slow weep at the cold nipple after 12 years or a sudden TPR opening during a pressure spike. The drain pan and its piping are your insurance policy. I prefer metal pans with a formed outlet, sized generously so the entire base of the heater plus a few extra inches is protected. Plastic pans crack during moves in and out of tight closets. If you must use plastic, avoid overtightening the outlet bulkhead. A drop of thread sealant helps.
The drain line should be full size from the pan to the termination, sloped continuously, and routed where it will not trap water. If you cannot get the pan to a proper termination, at least route it to a conspicuous location outside where you will see a drip. Running a pan drain to a sewer line without an air gap is a sanitation violation in most jurisdictions, and a future odor problem.
TPR discharge lines deserve equal attention. They should be the same size as the valve outlet, usually 3/4 inch, in a material approved by your code, with no threads at the end, and a termination that is safe and visible. I have seen TPR lines glued uphill, reduced to half inch, or tied into pan drains. Those jobs always come back during inspections. Lay out both drains on the wall before the unit arrives so there is no fight with the vent or water lines.
Seismic strapping and anchoring
In seismic zones, strapping is not decoration. A full tank weighs several hundred pounds. During a jolt, it behaves like a battering ram. Most codes call for two straps on gas or electric tanks, one in the upper third and one in the lower third of the body, anchored into framing or masonry with hardware that can handle the load. Kits sold at hardware stores often include thin straps that bend too easily or screws meant for drywall. Use solid metal strap kits with proper lag bolts or expansion anchors. For stucco or masonry walls, pre-plan your anchors so you do not end up trusting a strap to a hollow section.
I also like to use blocking between studs if the heater sits in a framed closet. A strip of 1 by 6 or 2 by 6 screwed across several studs spreads the load and lets you place the strap exactly where you want. Strap tightness matters. Too loose, and the heater slams into the strap before the strap engages. Too tight, and you can deform the tank jacket. Aim for firm contact without dimpling. Do not strap over insulation blankets that compress unevenly.
Shutoff valves, unions, and flexible connectors
The best time to improve fittings is before the new tank arrives. If your old installation uses rigid copper directly into the tank, plan to upgrade. Modern installations typically use dielectric nipples at the tank, then flexible stainless or copper connectors to the home’s piping, with a full-port ball valve on the cold side. This arrangement allows future water heater repair or replacement without heating and unsoldering inside a cramped closet.
Check the height of the existing water lines relative to the new tank. A taller unit can push connections into the drywall above, leaving no room for a gentle loop in a flex connector. Shorten or reroute as needed now. If you have PEX, verify you have the correct transition fittings and support near the heater so heat does not creep back to unsupported PEX during operation.
On the gas side, replace old gas valves that do not turn smoothly. Wrench-stiff quarter turns and corroded sediment traps are code failures waiting to happen. Make sure you have a drip leg (sediment trap) at the heater’s gas inlet and a union or flexible gas connector rated for the BTU load. Gas leaks start with rushed work in tight corners. Clearing space now lets the installer thread joints carefully and test with soapy water.
Electrical considerations for electric and hybrid units
Electric tank heaters are simple in concept but unforgiving about power. Confirm the circuit size and breaker match the new unit’s amperage. Many 40 to 50 gallon electric tanks draw 18 to 25 amps and require a 30 amp 240 volt circuit with 10 gauge copper. Heat pump water heaters can have different requirements, sometimes needing a dedicated 30 amp circuit and a neutral depending on control features. If your panel is marginal, address it before installation day.
For heat pump models, air volume and temperature are critical. Manufacturers specify minimum cubic feet of room space or require a ducting kit if installed in a smaller closet. You also need a condensate drain line or a pump to move water to a drain. Do not assume you can put a heat pump water heater in the same closet where your old electric unit lived. If you must, plan for louvered doors or ducting and a drip pan with a dedicated condensate line. I have installed hybrids in garages with louvered closet doors to steal air from the garage while keeping the unit out of sight, and they work well if the ducting is tight and the condensate pump has a reliable outlet.
Venting paths, materials, and termination
Venting can turn simple jobs into headaches. For atmospheric gas water heaters, use Type B vent for the vertical stack and galvanized single-wall for short runs in open space, with a minimum upward slope of a quarter inch per foot back to the chimney or B-vent. Keep horizontal runs short, avoid too many elbows, and maintain clearances to combustibles. Stains on the draft hood are a sign of backdrafting, which demands a hard look at combustion air and vent condition. If you change anything about the vent routing, a draft test after installation is non-negotiable.
Power-vent and direct-vent units use PVC, CPVC, or polypropylene vent systems per the manufacturer’s instructions. That means primer, cement, hangers at the right spacing, careful attention to termination height and distance from doors and windows, and, for condensing models, a plan for condensate neutralization if required. Pre-drill the exit path through the wall and install a sleeve if you can, especially in finished garages or closets. A clean, level sleeve makes the final vent assembly quicker and better looking.
Expansion tanks and thermal control
Closed plumbing systems https://collinfrhc860.theburnward.com/how-to-extend-the-life-of-your-new-tank-water-heater need a place for expanding water. Many jurisdictions now require an expansion tank on the cold-water inlet, sized for your static pressure and water heater volume. If you see a pressure regulator on your main line or a check valve at the meter, assume you need an expansion tank. Without one, pressure can spike on heat cycles and force the TPR valve to weep. Mount the tank with support, not just hanging off a short nipple. I install a strut or clamp so the tank’s weight is not bearing on the valve. Plan space on the wall near the cold inlet and install a shutoff for service.
While you are improving the cold inlet, a pressure gauge on a hose bib or a dedicated port can tell you if your home pressure is reasonable, typically 40 to 75 psi. If you see overnight peaks above 80 psi, fix the regulator before you blame the water heater for every drip. Many perceived water heater repair issues trace back to uncontrolled pressure.
Condensate, drains, and neutralization for high-efficiency setups
If you opt for a high-efficiency power-vent that condenses, or a heat pump water heater, you will have condensate to deal with. Condensate is mildly acidic for gas condensing units and usually neutral for heat pumps. For gas units, a neutralizer kit filled with media like limestone chips prevents corrosion in drains and meets many codes. Mount the neutralizer where media can be serviced, and slope lines so water does not sit in low spots and grow slime. Where gravity is not available, a mini pump with an alarm helps, but place the discharge where a failure will be noticed rather than inside a wall cavity.
Cleaning, staging, and day-of logistics
The physical space should be cleared at least two feet around the planned footprint. Remove shelves, hooks, and stored items. Lay down a path with rosin paper or cardboard from the exterior door to the installation area so the old tank can be removed without trashing flooring. If you have a narrow hallway, measure the widest point of the old tank and plan how it will pivot. Shut off gas and water at the main if accessible and label the valves. Charge the work light you will loan the installer if the closet has no fixture. A bright space reduces mistakes.
Set out the parts you have already purchased, but do not open packaging until the installer approves the materials. That includes the drain pan, flex connectors, gas connector, ball valve, expansion tank, vent materials, and strapping kit. If you are hiring a full-service water heater installation service, they will bring code-approved parts. Still, seeing the space ahead of time helps them choose the right kit and avoid emergency runs.
Edge cases I see often
Old homes bring surprises. Galvanized supply lines crumble at the touch. Replacing a short section with copper near the heater may not be possible without chasing pipe farther than planned. If you suspect galvanized lines, budget extra time and money. In manufactured homes, access and structural support can be limited, and dedicated closet kits are often required. In multifamily buildings, vent commons and HOA rules limit what you can change, and you will need to schedule water shutoffs. If a boiler shares a flue with a water heater, vent sizing becomes critical when you change either appliance. Any change in BTU input or vent configuration deserves a proper venting calculation.
Learn from small details. On a recent job, a client upgraded to a power-vent tank in a garage with a finished ceiling. We pre-located the vent termination on the side wall, then discovered the exterior wall had a decorative band that would have interfered with the vent hood. Because we had measured and marked early, we shifted the termination up six inches before drilling. That change saved an ugly patch and a call-back.
Planning for the future: service access and lifespan
Think about the next time. The anode needs replacement every 3 to 5 years in many water conditions. If you cannot pull a 3-foot rod straight up because a shelf or ceiling blocks it, consider a segmented anode or a removable shelf design. Leave space on top for the draft hood removal and on the sides for valve replacement. Label the shutoffs. Note the install date and set a reminder to flush sediment once or twice a year if your water is hard.
Tank water heaters last 8 to 12 years on average, sometimes 15 in gentle conditions. If your water is aggressive, adding a whole-home filter or softener affects the heater’s performance and warranty. Plan upstream treatment with your plumber so it does not starve the heater of flow or reduce the inlet pressure below what the control valve expects.
When to involve a pro early
There is a sweet spot for calling in professional water heater services. If your new heater differs in fuel type, venting, or efficiency class, get a site visit before you tear out the old unit. If your garage slope is severe, your closet lacks combustion air, or your old vent shows rust flakes, bring a pro in early. Many water heater replacement delays come from assumptions made in a rush, then discovered too late on install day.
You can still save money and time by doing prep: clearing the space, building a platform, framing blocking for straps, and running a drain line to a sensible location. Leave gas, vent, and electrical connections to licensed trades. Good installers appreciate clean, code-ready spaces. They work faster, charge less time, and you get a neater job.
Quick pre-install checklist
- Verify model type, dimensions, fuel, and venting so the space fits the new unit and the drain pan. Confirm code requirements for combustion air, TPR and pan drains, seismic strapping, and ignition height. Prepare a level base or stand, check slab slope, and plan safe, visible drain terminations. Create clear access, remove storage, stage materials, and ensure shutoffs and electrical circuits are ready. Pre-plan vent path, expansion tank mounting point, and any condensate routing with proper fall.
A word on tankless vs. tank in the same space
Some homeowners pivot to tankless during a replacement, thinking it will free up space in a closet or off a garage wall. Tankless water heater installation trades volume for infrastructure. You gain floor space, but you may need a larger gas line, a new Category III or polypropylene vent, condensate management, and sometimes a recirculation line to maintain comfort at distant fixtures. If your closet is tight and your garage lacks a straightforward vent run, tankless may involve more changes than you expect. Still, for homes with limited floor area and good access for venting and gas upgrades, it is a smart choice. Discuss it before you prep, not after.
Final pass before install day
Walk the space with a critical eye. The heater footprint fits with room to spare. The pan drains by gravity to a visible, safe location. The TPR line has a full-size path with no threads at the end. Combustion air openings are sized and located correctly for the selected model, and the vent route is known. Seismic straps have solid anchor points. Shutoff valves on water and gas operate smoothly. Expansion tank space is ready with a support bracket. The work area is bright and free of storage.
That is what a professional looks for on arrival. When you hand them a space like that, a tank water heater installation goes smoothly. You cut hours off the job, reduce surprises, and end up with a system that meets code and serves your home without drama. If you hit a snag, call your installer, send photos, and adjust the plan while the water is still hot in the old tank. Small steps, taken early, beat big fixes taken late. And a tidy closet or garage today means you will be ready, not scrambling, when the next water heater replacement comes due.
Best Plumbing Repair of San Diego LLC
Address: 2667 C St, San Diego, CA 92102
Phone: (619) 547-0097
Website: https://plumbergoldenhillsandiego.com/
Google Map: https://openmylink.in/r/best-plumbing-repair-san-diego-llc